Navigating the airport can be daunting. Even if you travel frequently, you may up feeling rushed and nervous the days leading up to travel.
We’re here to take some of the stress out of your travel with a list of what to do at the airport step by step.
Plan ahead for your travel day
Confirm all of your reservations
A week or two before you travel, confirm the bookings and reservations you have made including flight, car rental, lodging, dining, and events or excursions. You can keep track of your reservation information including dates and booking numbers in your digital calendar, email folder or try an app to keep your documents organized like Evernote or try a travel app like Wanderlog or TripIt
Make transportation arrangements to the airport
You have several options for MSP airport transportation. Taxi or share ride, shuttle, city bus, drop off by a friend, light rail, onsite and offsite airport parking. Decide how you’ll get to the airport and calculate the timing. For peace of mind, reserve ahead if you can to avoid the risk of getting turned away or delayed on your travel day.

Start packing early
Even if your trip is just a weekend getaway, don’t leave packing for the last minute. Make a mental plan or physical checklist of what you’d like to bring, make sure it’s freshly laundered and ready to go so you’re not scrambling the morning of travel which can lead to forgetting things. Label your bags and luggage with your name and phone in case they get lost!
Check-in online
If you haven’t started making this a regular practice, it’s time to start using this quick and easy feature. Airlines usually send you a reminder which makes online check-in very simple and easy to remember.
What’s more, you may be able to upgrade and choose seats when you check-in online rather than waiting at the gate to try to make changes. Download your boarding pass or the airline’s app to save your travel document on your phone rather than printing.
Set your alarm!
In fact, set two! Nothing starts off a travel day worse than waking up late and potentially missing your flight!
We’ve got you covered by answering the question, “How early do you need to be at the airport for your flight?”
What to do at the airport step by step
Wake up it’s the big day (see “Set your alarm” above)! Because you planned ahead, you’ve made a plan for getting to the airport, your bags are packed and you’ve checked in for your flight online.
How to check-in for your flight
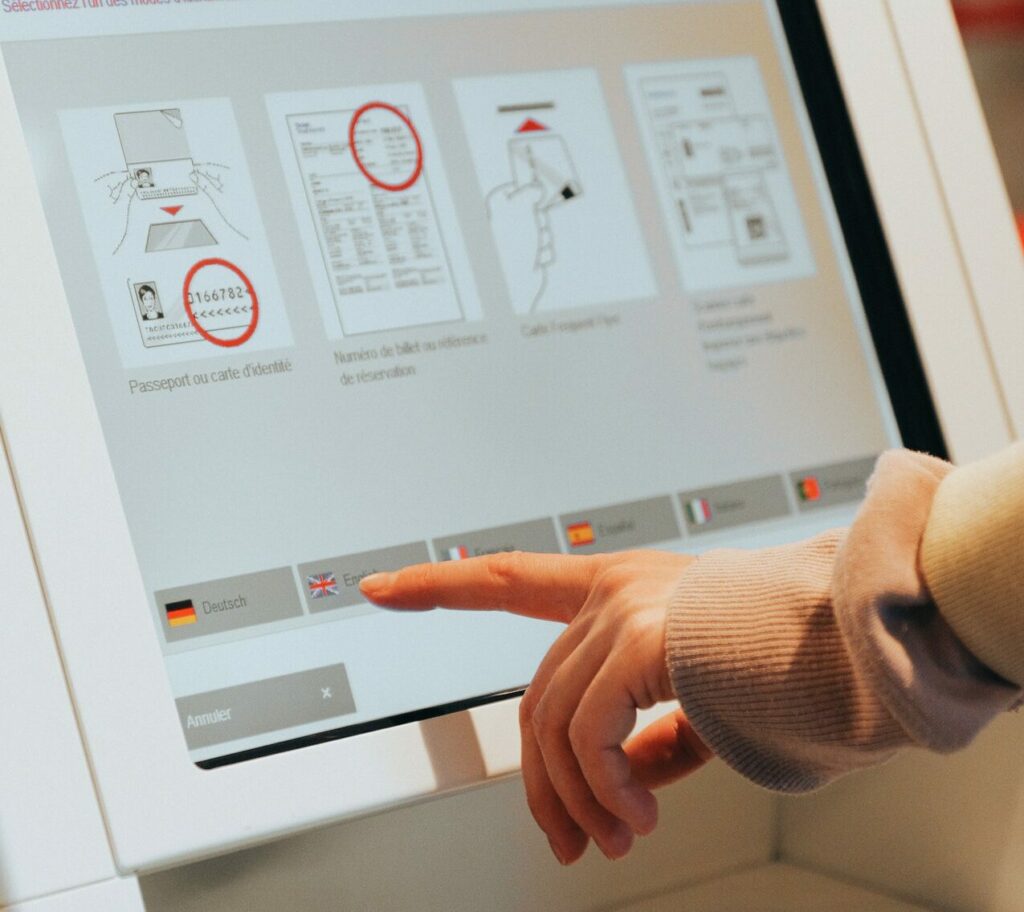
If you didn’t check-in online ahead of your trip, the airport has kiosks in the ticketing area and some airports will have ticket agents available to help you get checked in for your flight once you arrive at the airport. Note that each airline has its own kiosk you will need to use specifically.
The kiosk requires you identify yourself by asking for your confirmation number, frequent flyer number, or by inserting the credit card you used to purchase your tickets. Confirm all information is correct and make seat selections if prompted.
Next, print the boarding pass or send the digital pass to your cell phone by entering your phone number.
The kiosk will ask if you have bags to check, then direct you to the correct area to drop your bags before heading to security.
How to get through the security line
Get boarding pass and your legal photo identification out before you head to the security checkpoint. Both are required for entry. Acceptable identification includes state or military-issued ID or current passport. At the entrance to security you’ll most often have a choice for TSA PreCheck, Clear, or the general screening line.
Here are the general processes for getting through each security line:
- • Clear –Kiosks use biometric technology by scanning fingerprints or irises to identify travelers. After your identity is verified head to physical screening either through TSA PreCheck or the general security line. Clear requires background and security clearance along with monthly fees. It can be used in combination with TSA PreCheck or as a standalone.
- • TSA PreCheck – This paid option that allows passengers to go through a less rigorous physical check than the general security lane. It may vary but generally, passengers with PreCheck status can leave their shoes, belt, and light outerwear on and keep compliant liquids and electronics in their carry-ons rather than separating them all into bins. It can help speed up the screening process and is a much more comfortable experience. PreCheck can be used in combination with Clear or as a standalone.
- • TSA general screening – Every passenger boarding a plane must go through security screening via TSA. The general screening option is the most frequently used as there is no additional fee. Prepare for long lines and a little more work to get through physical screening. Before you get to the screening area a TSA agent will verify your identity and scan your boarding pass.
Once you get to the screening area, remove your shoes, belt, outerwear, and empty pockets of coins/keys (if required). We recommend wearing shoes that easily slip off and on and stow your coat in your bag until you get through security. Place these items and your snacks, 3-1-1 compliant liquids, and electronic devices in individual bins on the conveyor belt to be scanned separately. Study up on 3-1-1 so you’re prepared and get through the screening process more quickly.
How to find your gate at the airport
Your departing gate is often listed on your boarding pass. We recommend also checking the displays that show arriving and departing flights as departure gates can change quickly. You’ll also be able to see if the flight is scheduled to depart on time or if it has been delayed.
Next, look for a map or directional signs posted throughout the terminal to guide you to the correct gate via the correct concourse. The bigger the airport, the more concourses, and gates. MSP Terminal 1 has seven concourses containing over 100 gates. MSP Terminal 2 has just one concourse with 14 gates.
Do you have time to explore?
If you’ve made time for yourself to have some downtime at the airport before your flight or if your flight has been delayed, take some time to use the restroom, shop, grab a bite to eat, or get in some steps. Be careful not to stray too far away from your gate so that you don’t accidentally miss your flight!
We put together 17 things you can do at the airport while you wait for your flight.
Here’s what happens at your gate
Once you find your gate, you may have the opportunity to check for upgrades and seat assignment with the gate agent. They will announce boarding information and something call on passengers that have made special requests, so it’s important to listen to their announcements over the loudspeakers.
You may be asked to voluntarily check your carry-on bag when the flight is full. It isn’t required, but it will make boarding a bit easier for you. If you do gate-check your carry-on bag, then will tag it and give you a pickup slip. Sometimes your bag will be ready for you at the arrival gate but often it will be sent to baggage claim. It’s a nice way to check your bag for free if you don’t like the hassle of an overhead carry-on.
When it comes time to board, the agent will instruct passengers on when they can board. Every airline is a bit different, but many offer to board people that need extra assistance and first-class or elite status customers before general boarding. After pre-boarding is complete, they will invite all others to board based on a zone or number system.
Here are some examples of how airlines approach boarding:
- • United Airlines: Pre-boarding for those who need extra help, active military, and families with young children. Groups 1-5 start with two groups of customers with elite frequent flyer status and premium cabins, then finally those with Economy Plus, United Economy, and Basic Economy seats.
- • Southwest Airlines: You are assigned a boarding group (A, B, C) plus a boarding number. Line up at the gate near posts that display your position combination. When you board the plane, pick a seat. Southwest does not have assigned seating, a simple approach that confuses many travelers at first.
- • Delta Airlines: Pre-boarding for those needing extra time or assistance and active military start the boarding process. Next, Delta One, those who purchased Premium or First Class seating, Delta Comfort, and Sky priority customers. Finally, Main cabin passengers assigned in zones (1-3), then Basic economy customers.
- • American Airlines: American has 10 groups of boarding passes which start with their ConciergeKey members and end with the Basic Economy seats.
When you are called to board you won’t need your ID, but have your boarding pass ready for the gate agent.
Once you’re on the plane, look for your seat and stow your carry-on in the overhead storage or below the seat in front of you. Get seated and settled in quickly to speed up the boarding process for others around you and help for an on-time departure. Then, sit back and relax because all of that work to get through the airport has just paid off!

Get more tips on making travel easier direct to your inbox by joining our mailing list.